A complete, step-by-step guide to integrate WordPress SAML SSO with JumpCloud. Learn how to configure JumpCloud as SAML Identity Provider for WordPress and enable secure, seamless single sign-on for your users.
Ready to Secure Your WordPress Site?
Download the free SAML SSO plugin and start your JumpCloud SSO integration today.
Introduction to WordPress JumpCloud SSO
Managing user authentication on WordPress can be challenging, especially for organizations seeking both security and convenience. Integrating JumpCloud SAML SSO with WordPress allows you to centralize authentication, reduce password fatigue, and provide a seamless login experience for your users. With JumpCloud as your SAML Identity Provider, you can enforce strong security policies, enable multi-factor authentication, and manage users from a single dashboard.
This guide will walk you through the WordPress JumpCloud SSO setup process, ensuring your site is protected with enterprise-grade authentication and your users enjoy a frictionless login experience.
Benefits of WordPress JumpCloud SAML SSO Integration
Integrating JumpCloud SSO with WordPress offers a range of benefits for organizations of all sizes:
- Centralized User Management: Manage all users and permissions from the JumpCloud admin console
- Enhanced Security: Enforce MFA, password policies, and detailed audit logging
- Seamless Single Sign-On: Users log in once to access WordPress and other connected apps
- Reduced Password Fatigue: Eliminate the need for multiple credentials
- Compliance Ready: Meet enterprise security and compliance requirements with SAML 2.0
Prerequisites for WordPress SSO Setup with JumpCloud
- Active JumpCloud admin account with SSO permissions
- WordPress site with admin access
- Keywoot SAML SSO Plugin installed and activated
- SSL certificate enabled on your WordPress site
Step-by-Step Guide to WordPress JumpCloud SSO Setup
Install the WordPress SAML SSO Plugin
Start by installing the Keywoot SAML SSO plugin on your WordPress site to enable JumpCloud SSO login functionality.
Instructions:
- Log into your WordPress admin dashboard
- Navigate to Plugins → Add New
- Search for “Keywoot SAML SSO“
- Click Install Now and then Activate
Dashboard → Plugins → Add New → Search for “Keywoot SAML SSO”
Screenshots:

Create SAML Application in JumpCloud
Set up a new SAML application in your JumpCloud admin console for WordPress JumpCloud SSO integration.
Instructions:
- Log into your JumpCloud admin console
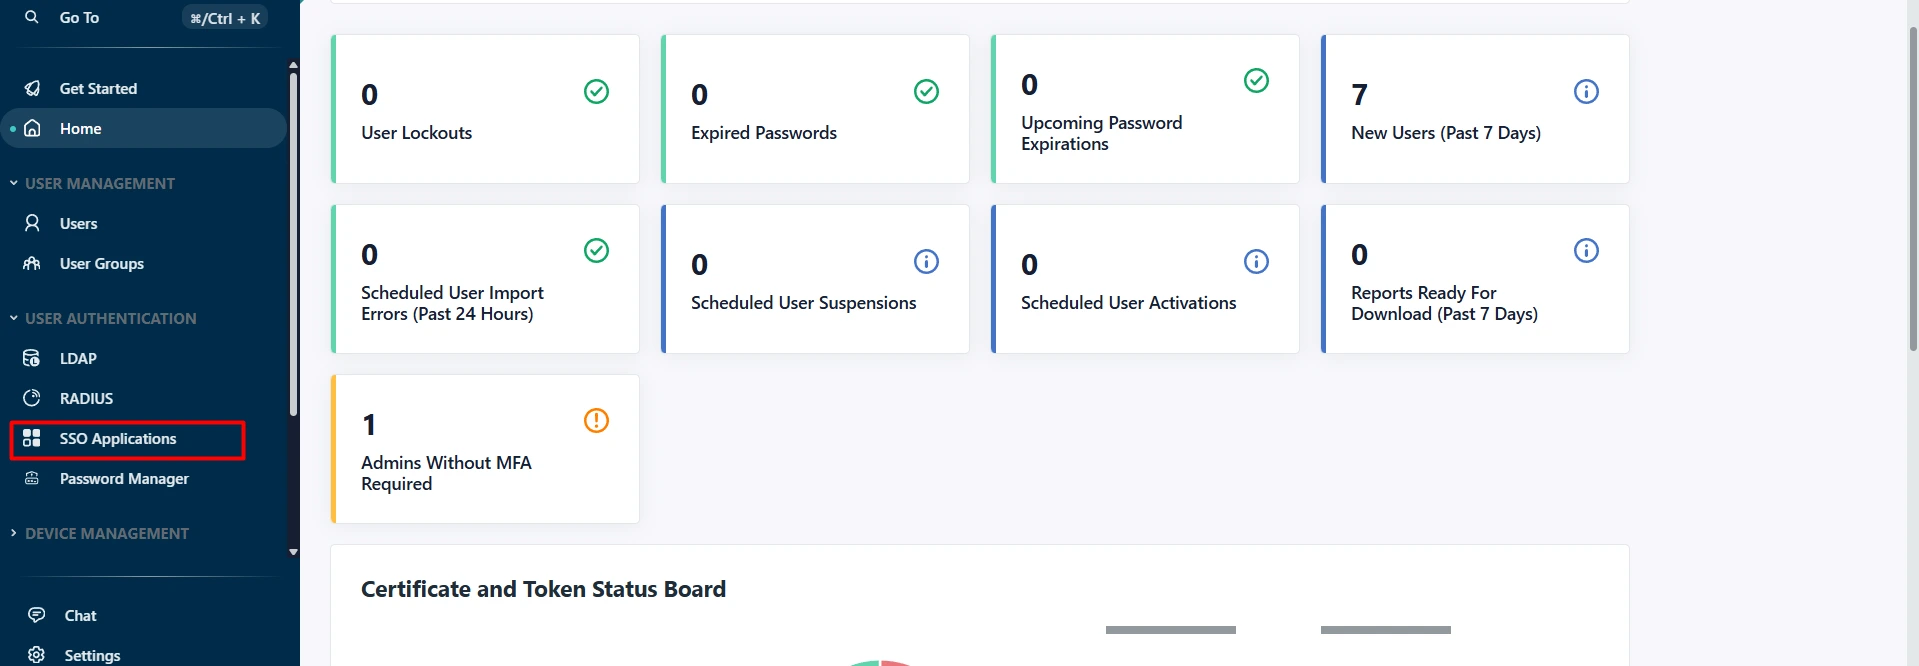
- Navigate to SSO in the left sidebar under user authentication section
- Click + (plus) to add a new SSO application
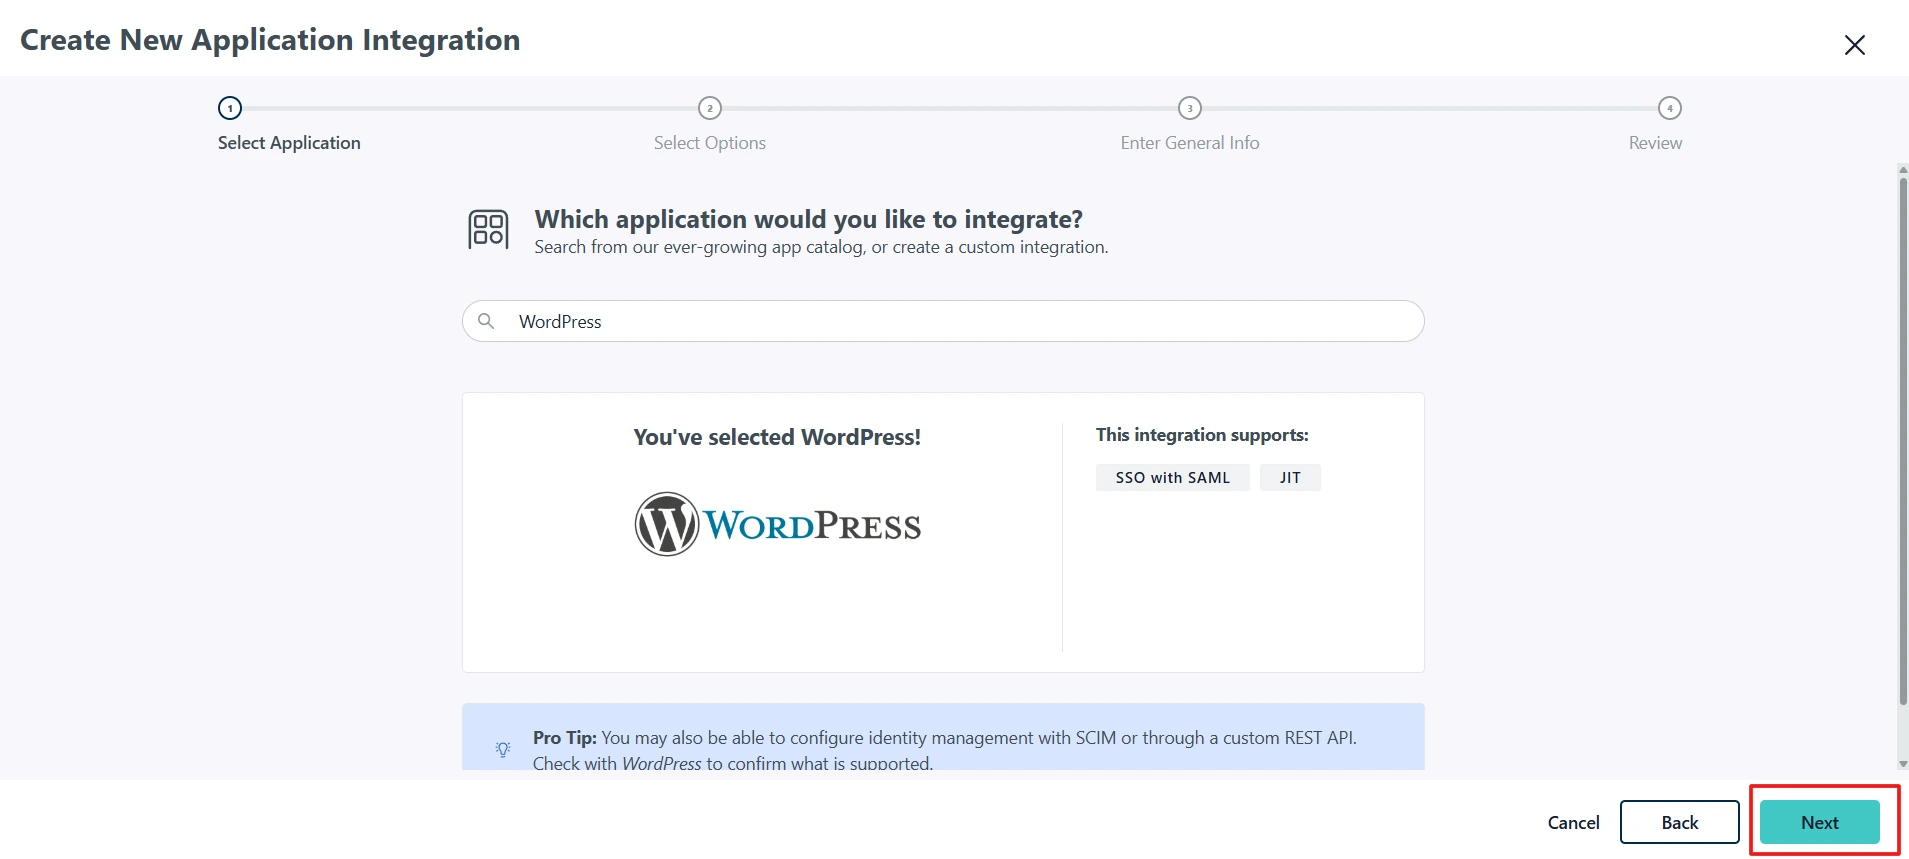
- Search for and select WordPress from the application catalog
- Enter a Display Label (e.g., “WordPress SSO”)
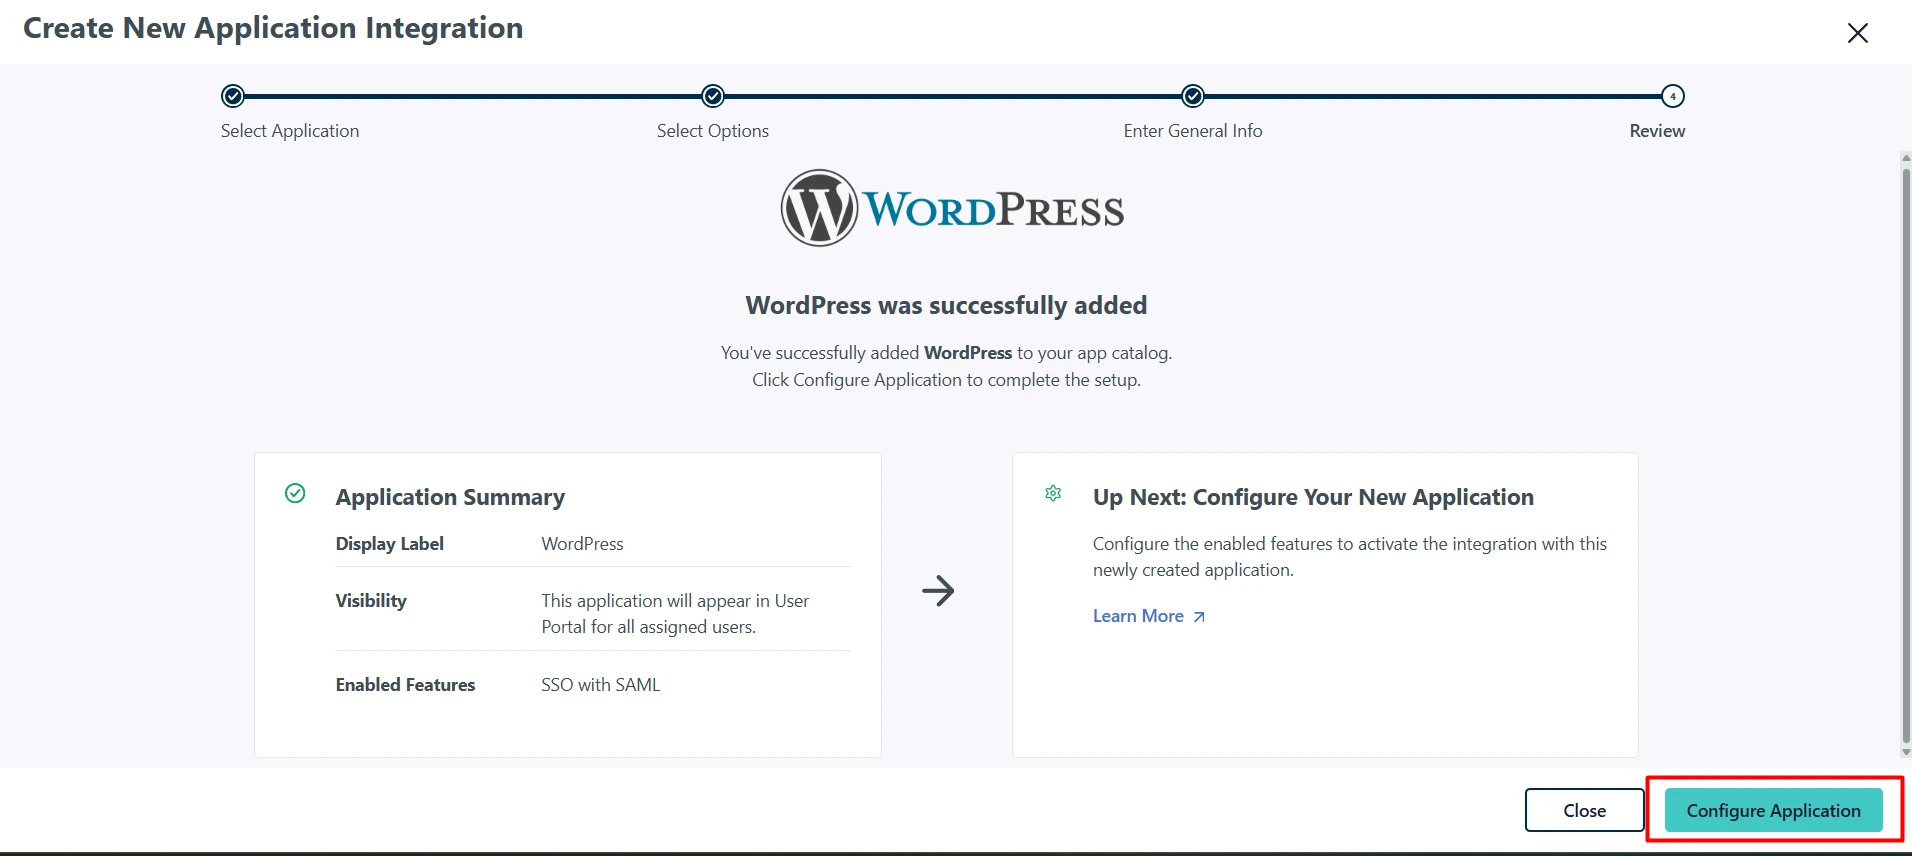
- Click Next and then click Configure Aplication to create the application
Screenshots:

Configure SAML Settings in JumpCloud
Set up the SAML configuration with the correct settings for WordPress JumpCloud login.
Instructions:
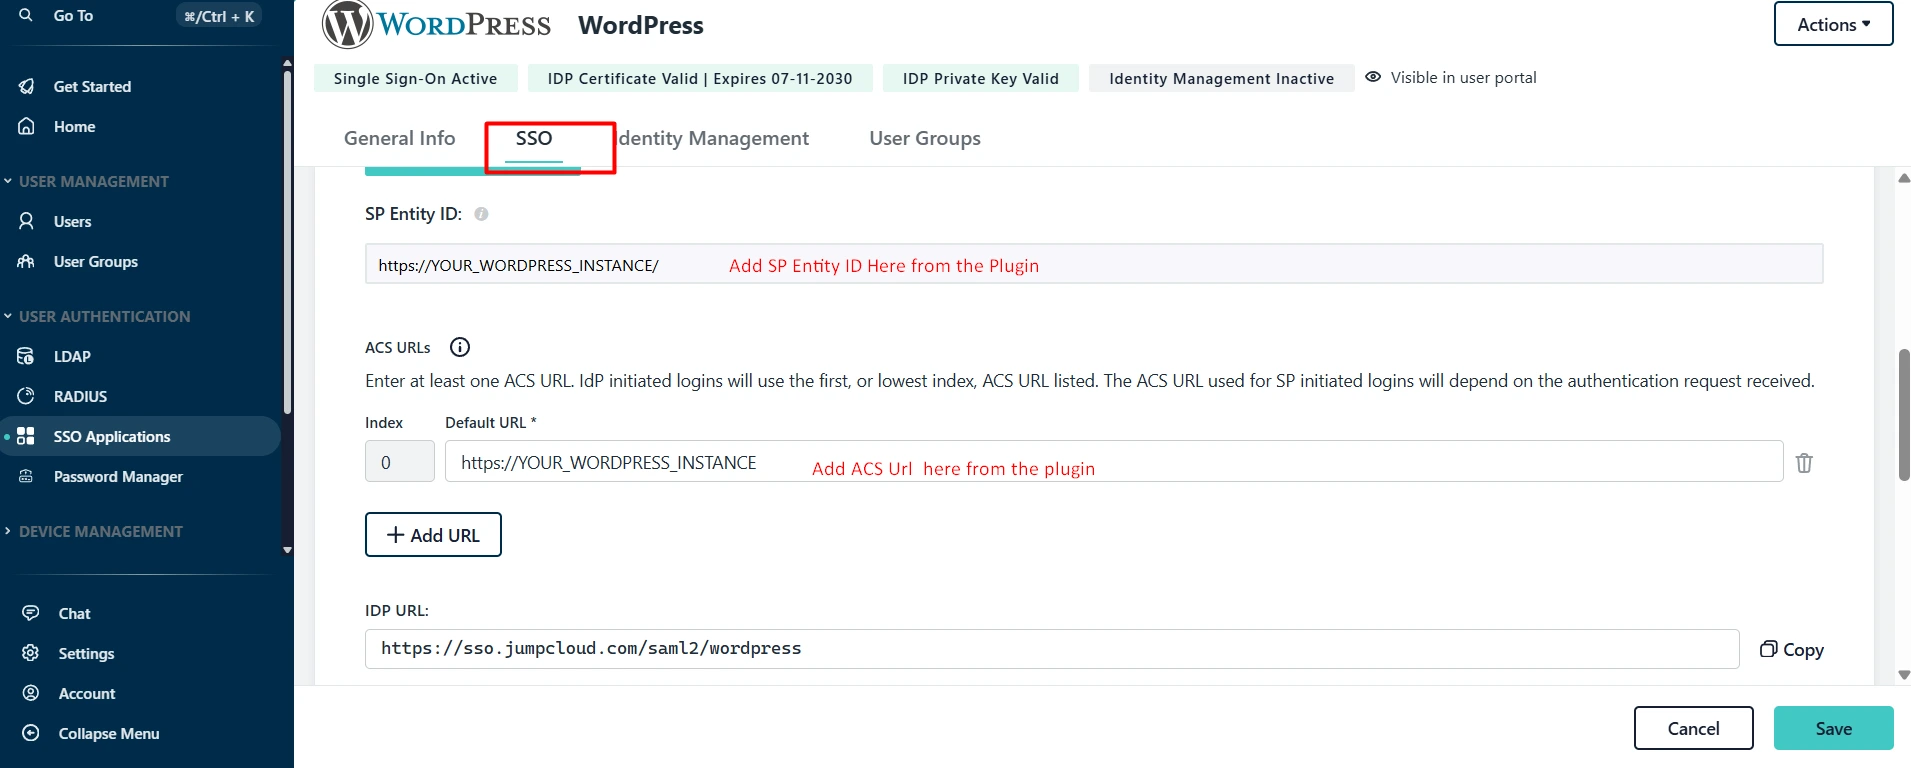
- In the SSO tab of your WordPress application, configure:
- SP Entity ID: Enter the SP Entity ID from your WordPress SAML SSO plugin’s Service Provider tab
- ACS URL: Enter the ACS URL from your WordPress plugin’s Service Provider tab
- Leave Rest of the thing as it is, do not make any other changes:
- The User Attributes section will be pre-configured for WordPress. if you want you can add more attributes as per your requirement:
- email → JumpCloud field: “email”
- first_name → JumpCloud field: “firstname”
- last_name → JumpCloud field: “lastname”
- user_login → JumpCloud field: “username”
- Click Save to enable the application
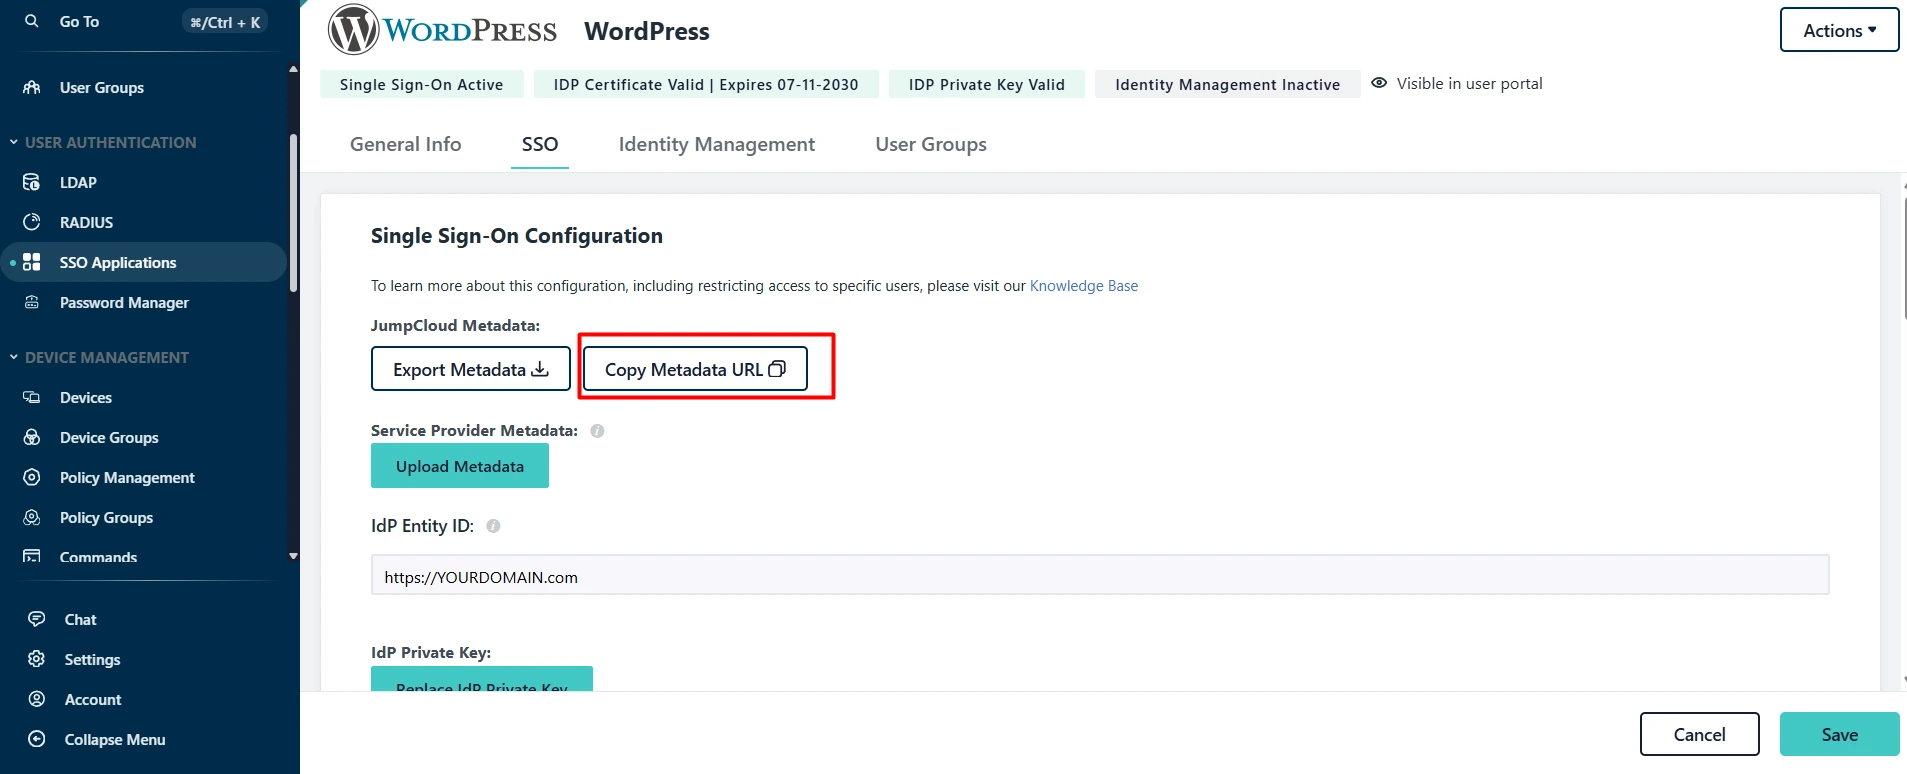
- Click on Copy Metadata URL button to copy the IDP Metadata URL for WordPress configuration in the next steps
Assign User Groups to the Application
Assign the appropriate user groups to the WordPress application in JumpCloud to control access.
Instructions:
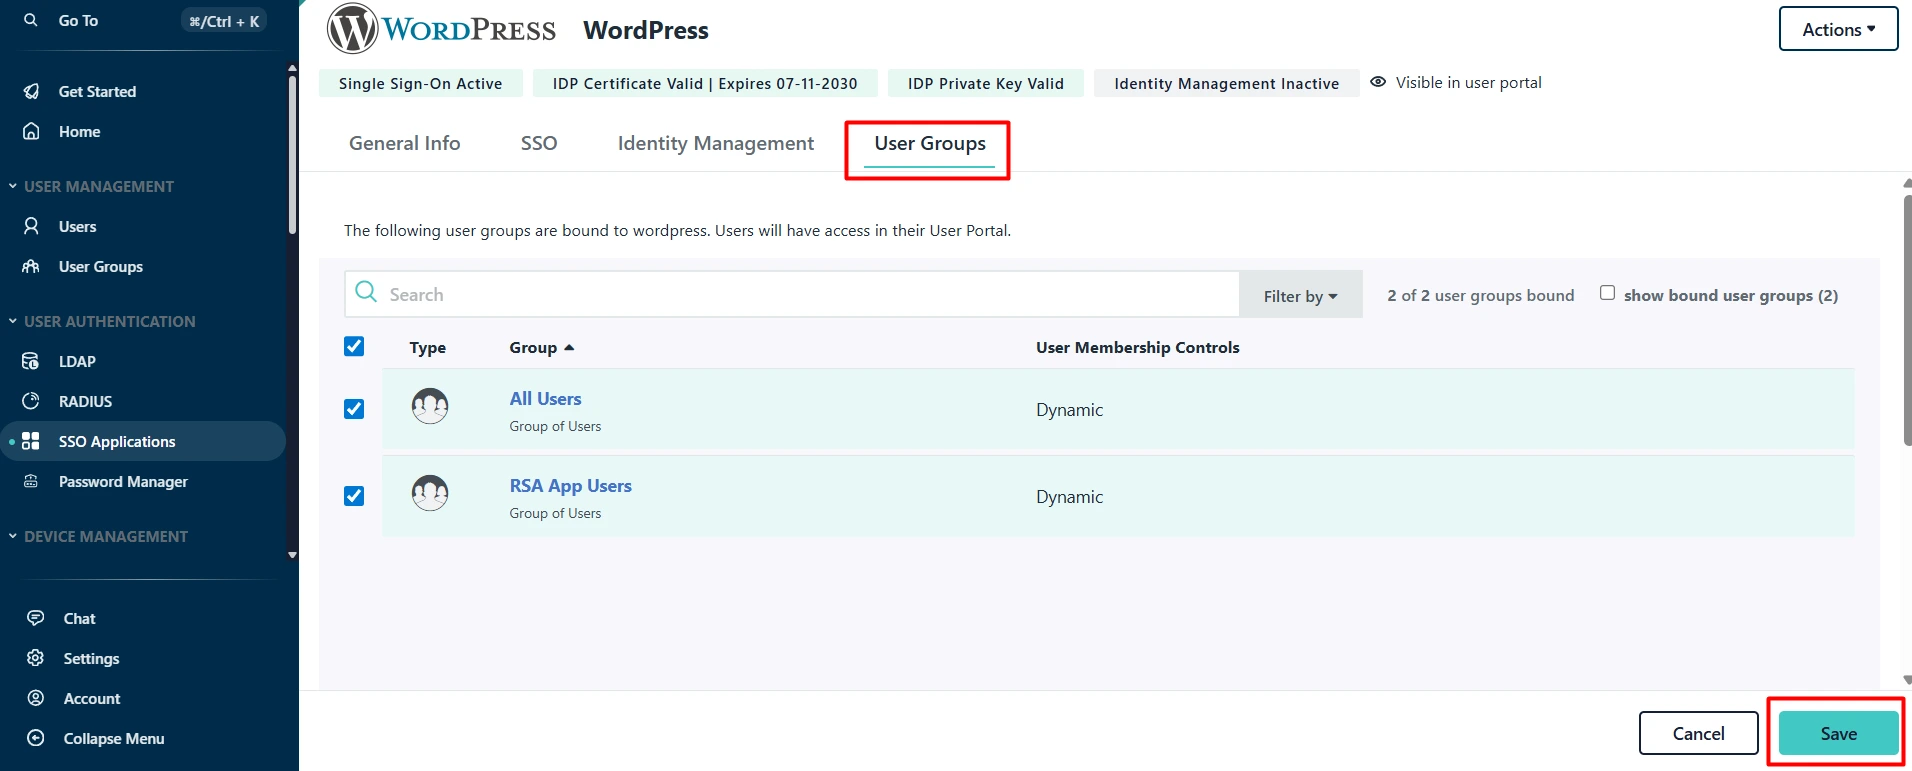
- In your JumpCloud WordPress application, navigate to the User Groups tab
- Select the user groups that should have access to WordPress
- Click Save to assign the groups
Screenshots:
Configure WordPress Plugin Settings
Set up the SAML SSO plugin with JumpCloud WordPress application details for WordPress JumpCloud SSO.
Instructions:
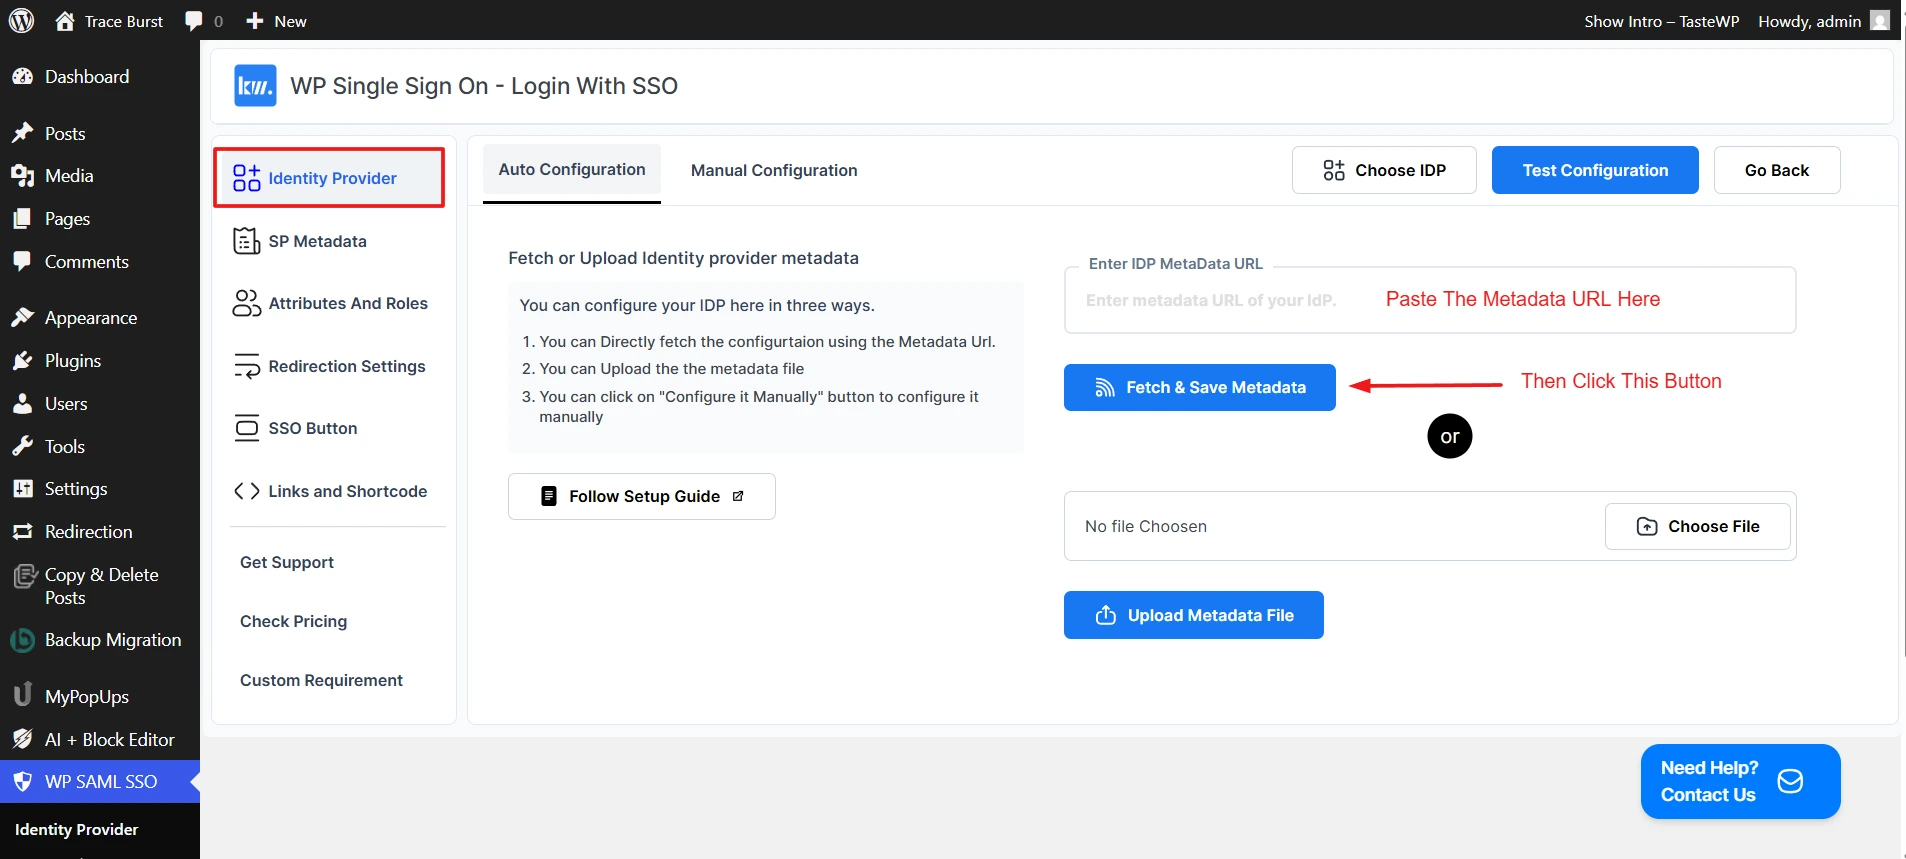
- Go to WP SAML SSO Plugin Settings in WordPress
- Navigate to Identity Provider tab
- Paste the metadata URL (IDP Metadata URL: which we copied in the previous step) in the IDP Metadata URL field
- Click on Fetch Metadata button to fetch the metadata
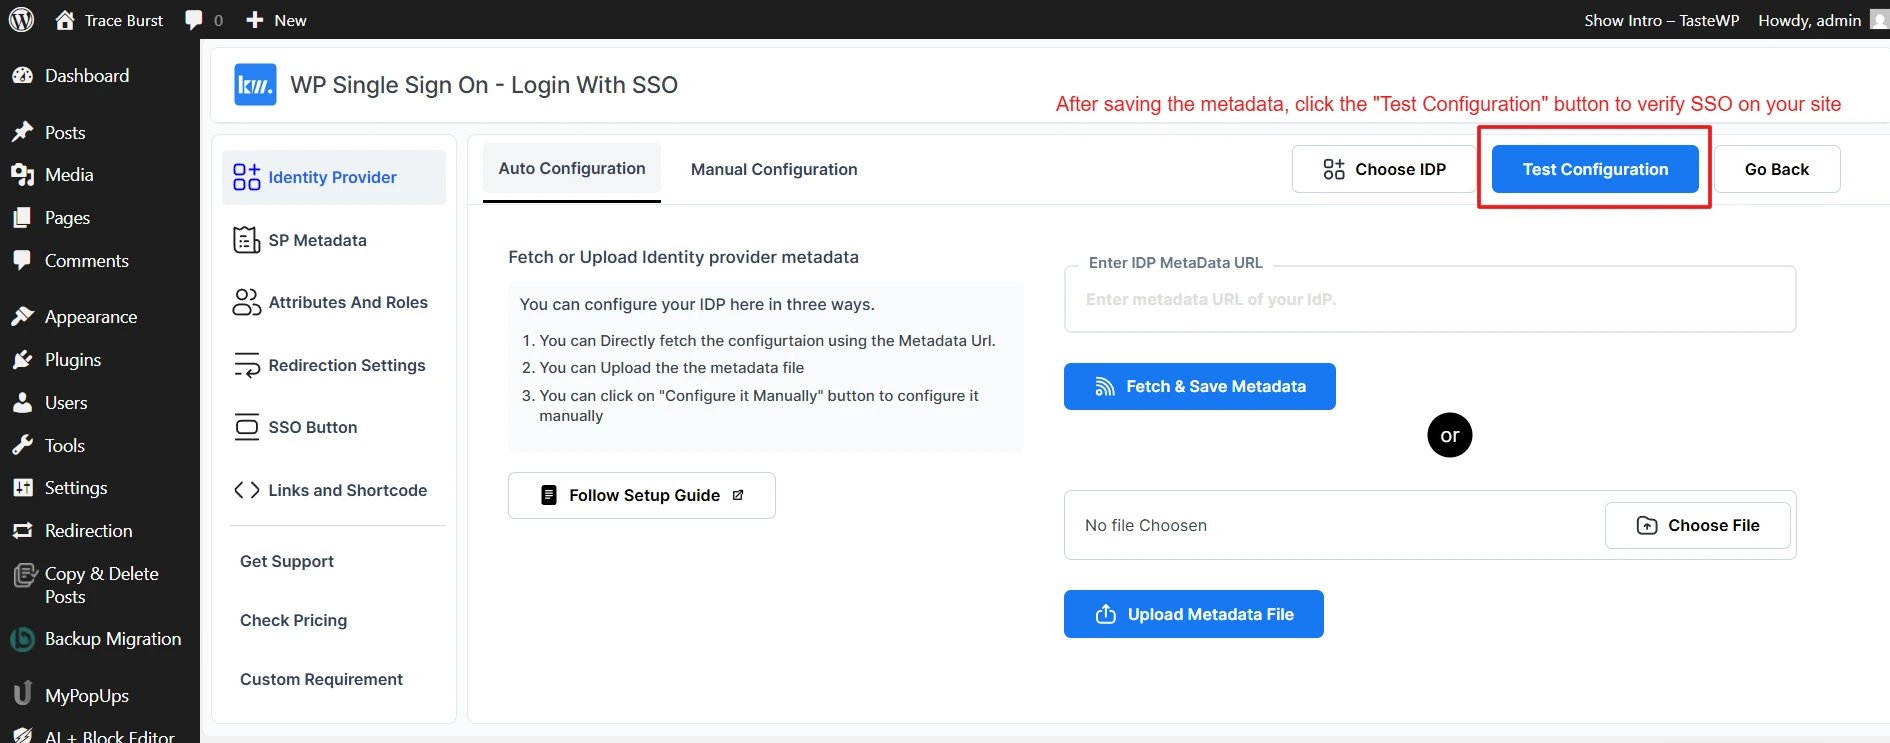
Test WordPress JumpCloud SSO Integration
Test the SSO integration to ensure everything is working correctly.
Instructions:
- In WordPress, navigate to WP SAML SSO Plugin Settings
- Click on Test Configuration in the plugin to verify the setup
- This will open up a popup window and redirect you to the JumpCloud login page
- Authenticate with your assigned JumpCloud user credentials
- After successful authentication, you should be redirected back to WordPress and you should see a success message screen along with the attributes received from JumpCloud
Frequently Asked Questions About WordPress JumpCloud SSO
WordPress JumpCloud SSO is an enterprise-grade authentication solution that enables secure access to WordPress using JumpCloud credentials. This integration implements SAML 2.0 protocol, where JumpCloud serves as the Identity Provider and WordPress as the Service Provider. The solution enhances security by eliminating password-related risks, providing centralized authentication management, enabling multi-factor authentication, and offering detailed audit logging for compliance.
To set up JumpCloud WordPress login with SAML SSO, follow these steps:
- Install the Keywoot SAML SSO plugin on your WordPress site
- Set up a new SAML application in your JumpCloud admin console
- Configure SAML settings in JumpCloud
- Upload the JumpCloud metadata file to the WordPress SAML SSO plugin
- Test the integration
WordPress SAML JumpCloud integration provides several key benefits:
- Centralized Security: Manage users and permissions from JumpCloud
- Enhanced User Experience: Single sign-on eliminates password fatigue
- Enterprise Compliance: SAML 2.0 protocol ensures industry-standard security
- Advanced Features: Group-based access, MFA, and detailed audit logs
JumpCloud WordPress Single Sign-On works through the SAML 2.0 protocol:
- User attempts to access WordPress site
- WordPress redirects to JumpCloud (Identity Provider)
- User authenticates with JumpCloud credentials
- JumpCloud sends SAML assertion back to WordPress
- WordPress validates the assertion and logs user in
- User gains access without entering WordPress credentials
Common issues when setting up WordPress JumpCloud SSO include:
- Incorrect URLs: Ensure ACS URL and Entity ID match exactly between JumpCloud and WordPress
- SSL Certificate Issues: Both JumpCloud and WordPress must use HTTPS
- Attribute Mapping: User attributes may not map correctly between systems
- Role Assignment: WordPress roles may not be assigned properly from JumpCloud groups
- Metadata Issues: Outdated or incorrect metadata files can cause authentication failures
Yes, you can use JumpCloud WordPress login with multiple WordPress sites. This is one of the key benefits of SAML SSO:
- Create separate SAML applications in JumpCloud for each WordPress site
- Users authenticate once with JumpCloud and can access all connected sites
- Centralized user management across all WordPress installations
- Consistent security policies and authentication methods
- Reduced administrative overhead for managing multiple sites
Wrapping Up
You’ve now completed the comprehensive setup guide for integrating SSO on WordPress with JumpCloud as an Identity Provider(IDP). By following these steps, you’ve successfully configured a secure, enterprise-grade authentication system that enhances both security and user experience.
The integration provides seamless single sign-on capabilities, centralized user management, and robust security features through SAML 2.0 protocol. Your WordPress site is now equipped with modern authentication standards that scale with your organization’s needs.
Ready to Get Started?
Download the free plugin and make your WordPress site more secure with JumpCloud SSO.

