A comprehensive guide to set up WordPress Auth0 SSO with SAML authentication. Learn how to configure Auth0 WordPress login for secure single sign-on and enhanced user experience.
Ready to Get Started?
Download the free plugin and make your WordPress site more secure.
Introduction to WordPress Auth0 SSO
Managing a WordPress website requires balancing security with user convenience, especially for authentication. Implementing SSO on WordPress Site with Auth0 as your SAML Identity Provider (IdP) is an excellent way to achieve both. WordPress login via Auth0 SSO simplifies the login process by allowing users to authenticate once and access multiple websites or applications without re-entering credentials, much like using a single key for multiple doors.
By setting up WordPress SAML Auth0 integration, you can enhance security through centralized authentication while providing a seamless and user-friendly login experience for your website visitors. Our WordPress SAML SSO plugin makes this integration straightforward and secure.
Benefits of WordPress Auth0 SAML SSO
Integrating Auth0 with WordPress for SSO offers several significant benefits:
- Enhanced Security: With features like MFA and role-based access control, Auth0 strengthens your site’s defenses
- Improved User Experience: Users enjoy a faster, smoother login process, leading to higher satisfaction and engagement
- Streamlined Management: Centralized user management simplifies handling roles and permissions across your WordPress site
- Reduced Password Fatigue: Eliminate the need for multiple passwords across different systems
- Enterprise-Grade Features: Access advanced authentication features like social logins, enterprise connections, and compliance tools
Prerequisites for WordPress SSO Setup with Auth0
- Active Auth0 account with admin access
- WordPress site with admin privileges
- Keywoot SAML SSO Plugin installed
- SSL certificate for secure communication
Step-by-Step Guide to WordPress Auth0 SSO Setup
Install the WordPress SAML SSO Plugin
Begin by installing the Keywoot SAML SSO plugin in your WordPress site to enable Auth0 WordPress login functionality.
Instructions:
- Log into your WordPress admin dashboard
- Navigate to Plugins → Add New
- Search for “Keywoot SAML SSO“
- Click Install Now and then Activate
Dashboard → Plugins → Add New → Search for “Keywoot SAML SSO”
Screenshots:

Create SAML Application in Auth0
Set up a new SAML application in your Auth0 dashboard for WordPress Auth0 SSO integration.
Instructions:
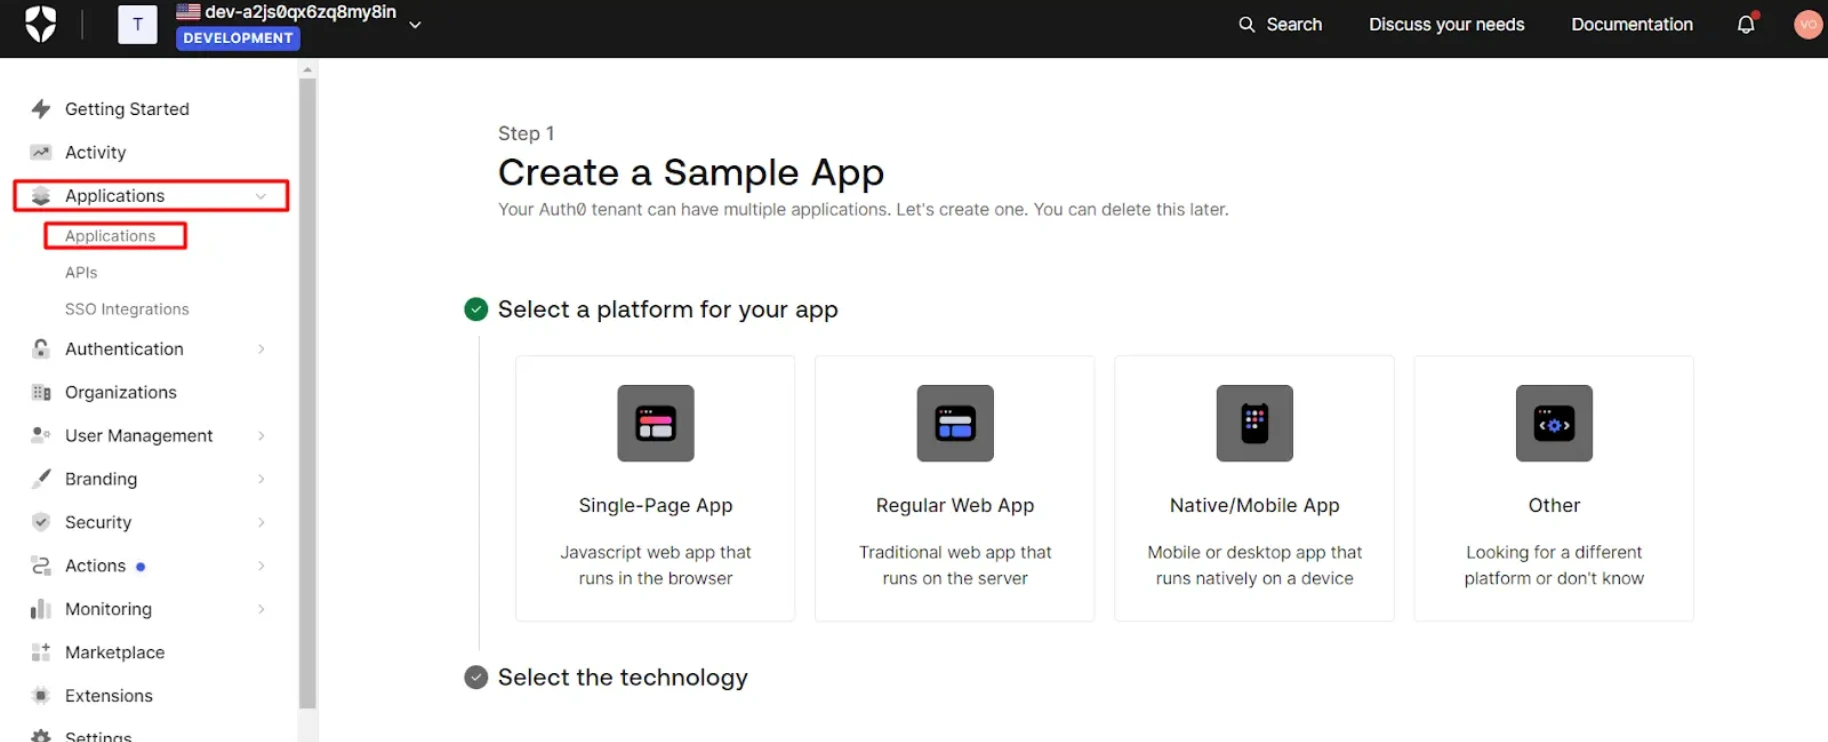
- Log into Auth0 Dashboard
- Navigate to Applications in the sidebar
- Click Create Application
- Name your application (e.g., “WordPress SSO”)
- Select Regular Web Applications and click Create

Configure SAML Settings in Auth0
Set up the SAML configuration with the proper settings for WordPress Auth0 login.
Instructions:
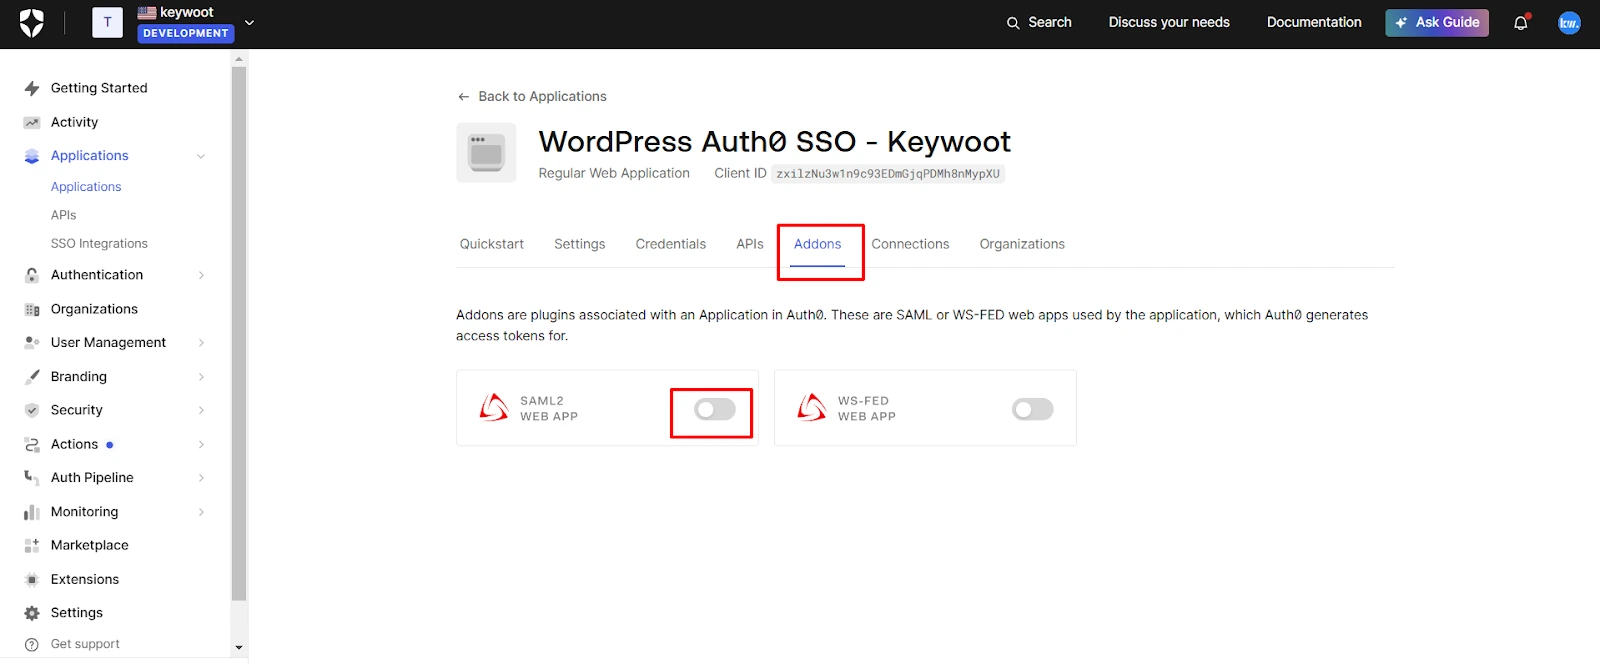
- Once Application is created, Go to the Addons tab and activate the SAML 2.0 switch. This will open a popup window.
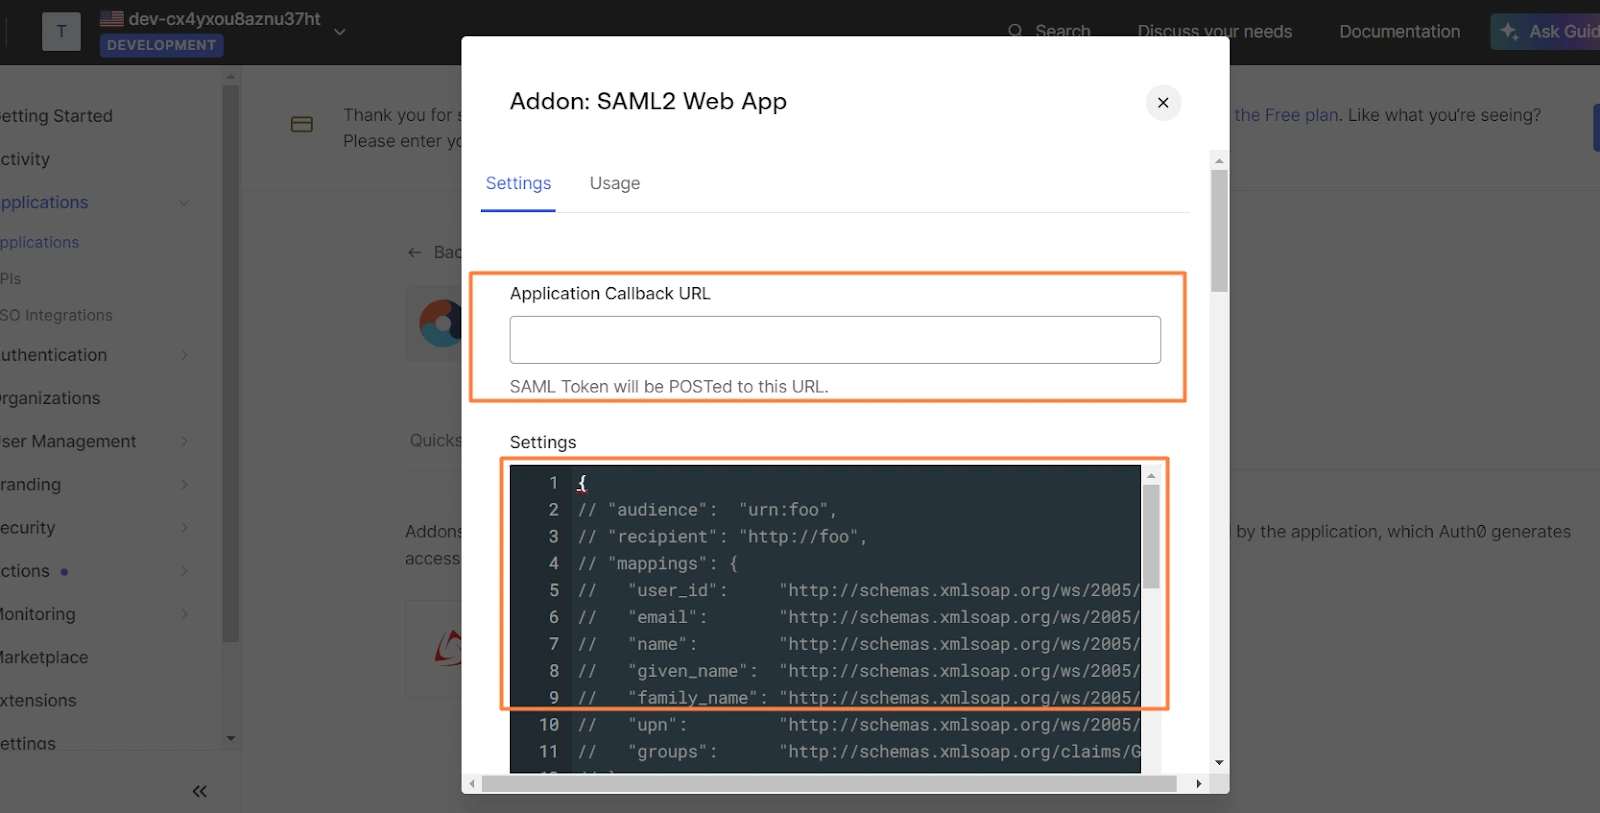
- Click on the Settings tab in the SAML configuration popup
- In the Application Callback field, Fill the ACS URL (AssertionConsumerService URL), which you can find in the Metadata tab of our plugin.
- In the Settings area, copy and paste the configuration code below
- Make the following replacements in the code:
- Replace https://KeywootPluginEntityID with the SP Entity ID from your plugin
- Replace http://KeywootPluginACSURL with the ACS URL from your plugin
- Replace https://KeywootPluginSingleLogoutURL with the ACS URL from your plugin
- Click Save to apply the configuration
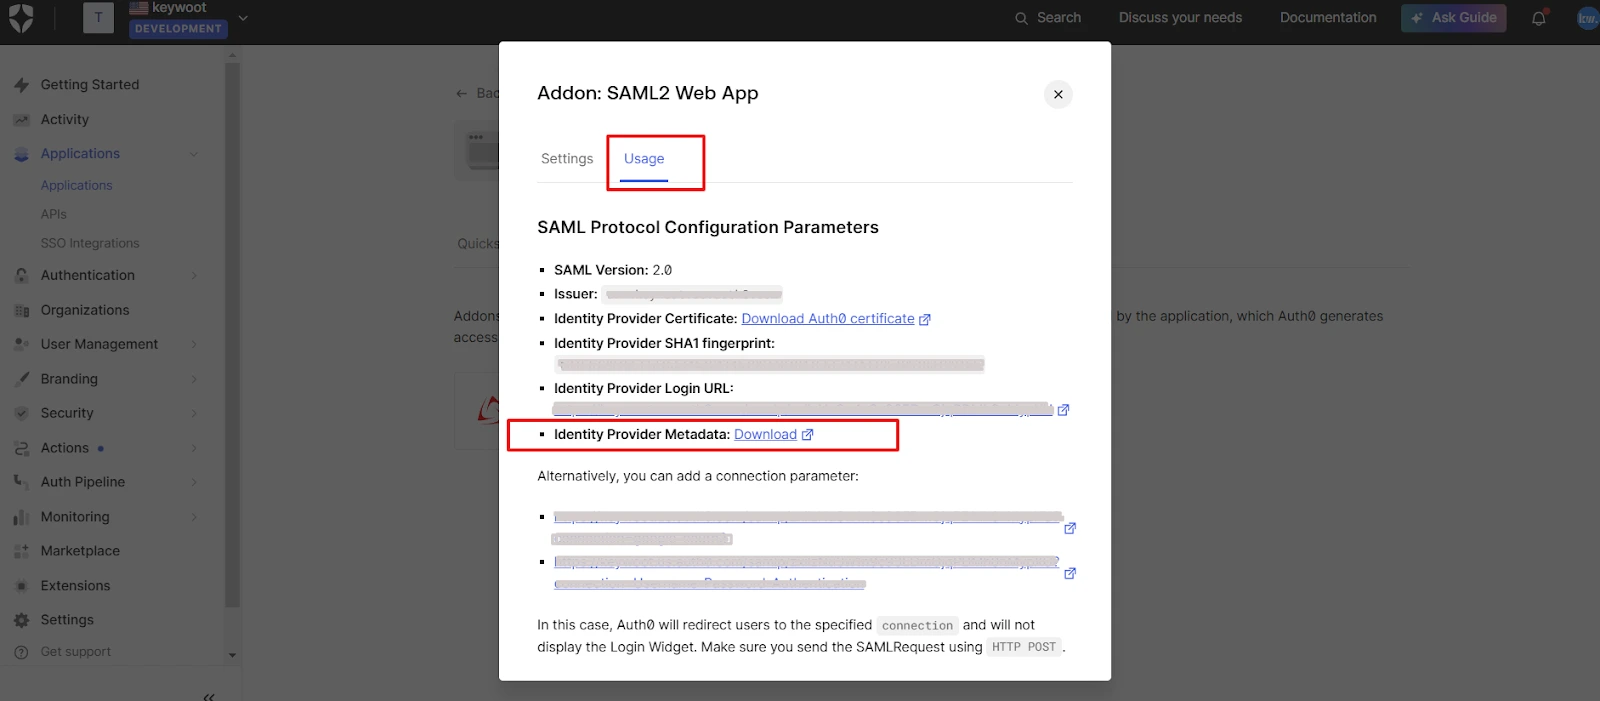
- Go to the Usage tab and download the Identity Provider Metadata
Configure WordPress Plugin Settings
Set up the SAML SSO plugin with Auth0 configuration details for WordPress Auth0 SSO.
Instructions:
- Go to WP SAML SSO Plugin Settings in WordPress
- Navigate to Identity Provider tab
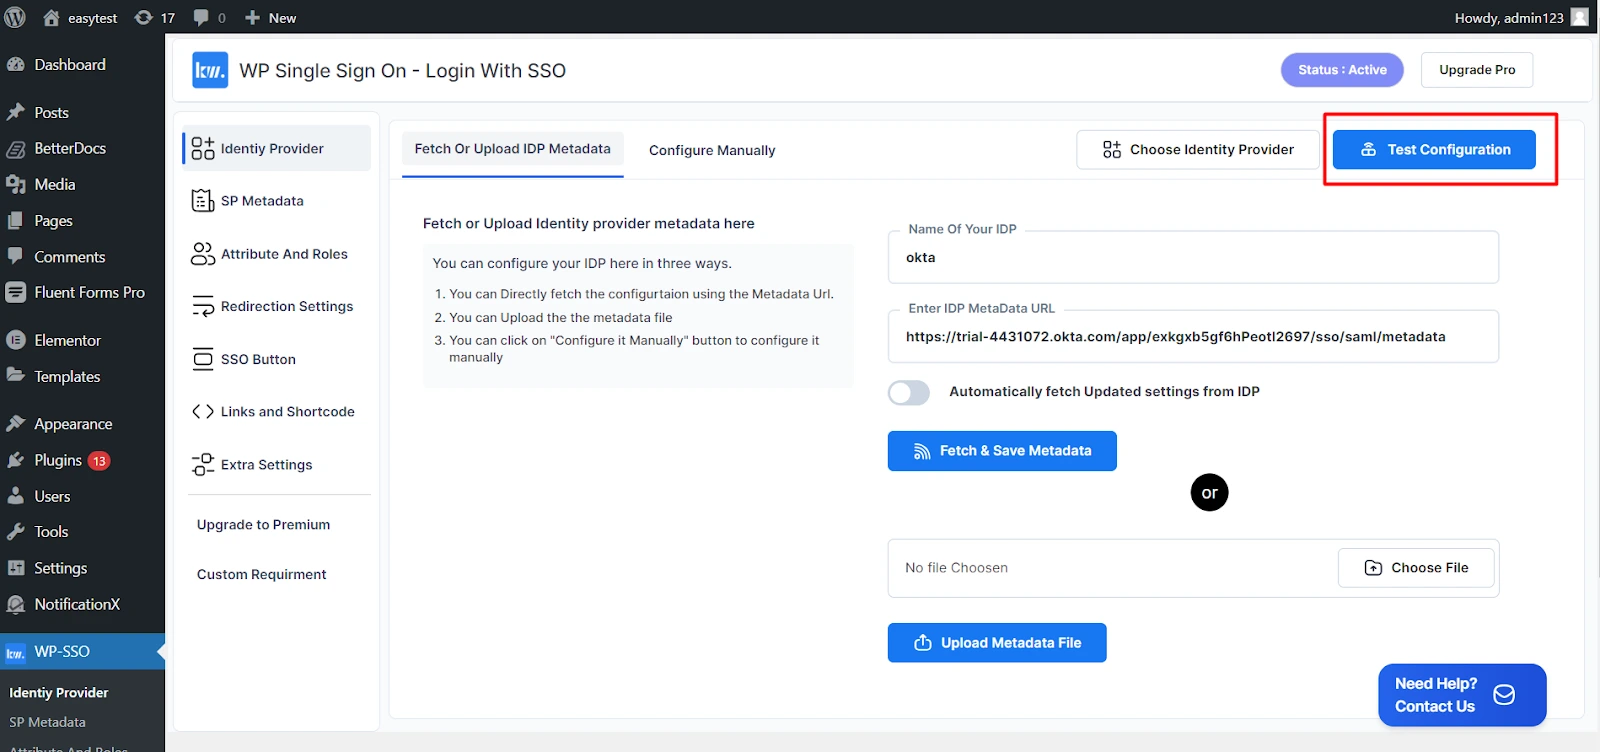
- Upload the Auth0 metadata file you downloaded earlier
- Alternatively, you can use the metadata URL to fetch it automatically
Test the WordPress Auth0 SSO Integration
Verify your configuration is correct and setup is working correctly.
Instructions:
- Click on Test Configuration to verify the setup
- This will open a new window asking you to log in using Auth0 credentials
- Authenticate with your Auth0 account
- Verify successful login and access to WordPress
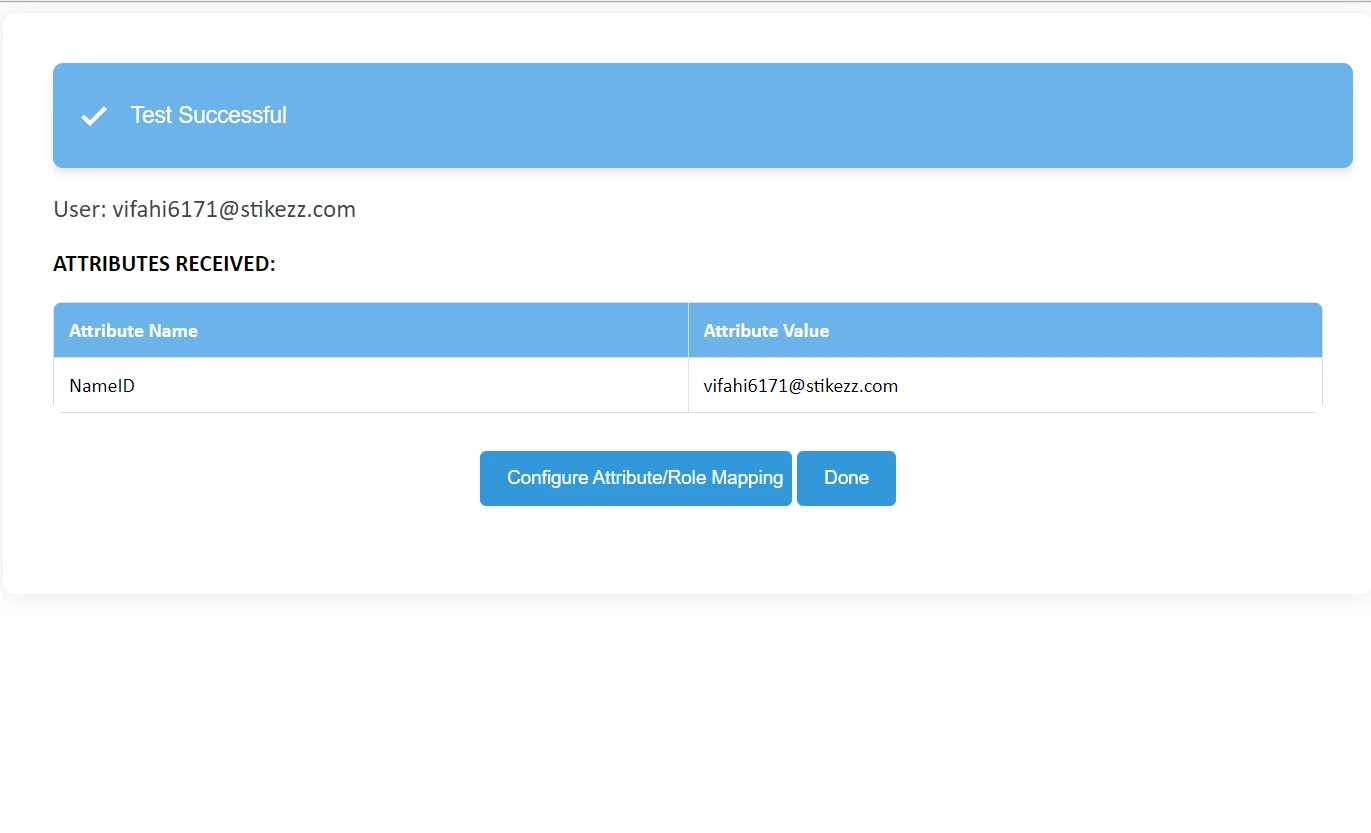
- After logging in, you should see a successful test connection screen
Frequently Asked Questions About WordPress Auth0 SSO
WordPress Auth0 SSO is an enterprise-grade authentication solution that enables secure access to WordPress using Auth0 credentials. This integration implements SAML 2.0 protocol, where Auth0 serves as the Identity Provider and WordPress as the Service Provider. The WordPress Auth0 Single Sign-On solution enhances security by eliminating password-related risks, providing centralized authentication management, enabling multi-factor authentication, and offering detailed audit logging for enterprise security compliance.
To set up Auth0 WordPress login with SAML SSO, follow these steps:
- Install the Keywoot SAML SSO plugin on your WordPress site
- Set up a new SAML application in your Auth0 dashboard
- Configure SAML settings in Auth0
- Upload the Auth0 metadata file to the WordPress SAML SSO plugin
- Test the integration
WordPress SAML Auth0 integration provides several key benefits:
- Enhanced Security: Multi-factor authentication and centralized identity management
- Improved User Experience: Single sign-on eliminates password fatigue
- Enterprise Compliance: SAML 2.0 protocol ensures industry-standard security
- Centralized Management: Manage users and permissions from Auth0 dashboard
- Advanced Features: Social logins, enterprise connections, and detailed audit logs
Auth0 WordPress Single Sign-On works through the SAML 2.0 protocol:
- User attempts to access WordPress site
- WordPress redirects to Auth0 (Identity Provider)
- User authenticates with Auth0 credentials
- Auth0 sends SAML assertion back to WordPress
- WordPress validates the assertion and logs user in
- User gains access without entering WordPress credentials
Common issues when setting up WordPress Auth0 SSO include:
- Incorrect URLs: Ensure ACS URL and Entity ID match exactly between Auth0 and WordPress
- SSL Certificate Issues: Both Auth0 and WordPress must use HTTPS
- Attribute Mapping: User attributes may not map correctly between systems
- Role Assignment: WordPress roles may not be assigned properly from Auth0 groups
- Metadata Issues: Outdated or incorrect metadata files can cause authentication failures
Yes, you can use Auth0 WordPress login with multiple WordPress sites. This is one of the key benefits of SAML SSO:
- Create separate SAML applications in Auth0 for each WordPress site
- Users authenticate once with Auth0 and can access all connected sites
- Centralized user management across all WordPress installations
- Consistent security policies and authentication methods
- Reduced administrative overhead for managing multiple sites
Conclusion
You’ve now completed the comprehensive setup guide for integrating SSO on WordPress with Auth0 SSO. By following these steps, you’ve successfully configured a secure, enterprise-grade authentication system that enhances both security and user experience.
The integration provides seamless single sign-on capabilities, centralized user management, and robust security features through SAML 2.0 protocol. Your WordPress site is now equipped with modern authentication standards that scale with your organization’s needs.
Ready to Get Started?
Download the free plugin and make your WordPress site more secure.

